the right tights

sooooo, I used to have opinions about tights as pants. I say “used to”, because I’ve been on a bit of a tight-making extravaganza of late. I blame my change of heart on three things:

1) Going running more often, and wanting fun things to wear

2) Other people looking like they were pretty much winning at life whilst wearing their cool tights

3) Spandex world. Soooo much crazy fabric.

In combination, these things have made me want, nay, NEED radass tights in my wardrobe, partially for hella-cool exercise gear that makes me feel excited to go running, and now for generally-awesome daywear.

I got to physically visit on a trip to New York this year (SO exciting…), and I got some really awesome spandex that I’ve been slowly turning into really awesome things. I drafted a pattern using Cal Patch’s tutorial over on Etsy, and after a few tweaks, have my pattern downpat. So far I’ve made two versions that are designated running tights. Here’s the first:

floral tights 1 floral tights 2

Isn’t the floral print fabulous? I have some leftovers I want to make into swimmers.

The next pair I’m wearing for the Bridge to Brisbane tomorrow, which is an annual 10km run that’s very popular here in Brissy. I helped a bunch of friends make their own tights out of the harlequin fabric, and we are all wearing them with different coloured tops. Fun!

harlequin tight harlequin tights

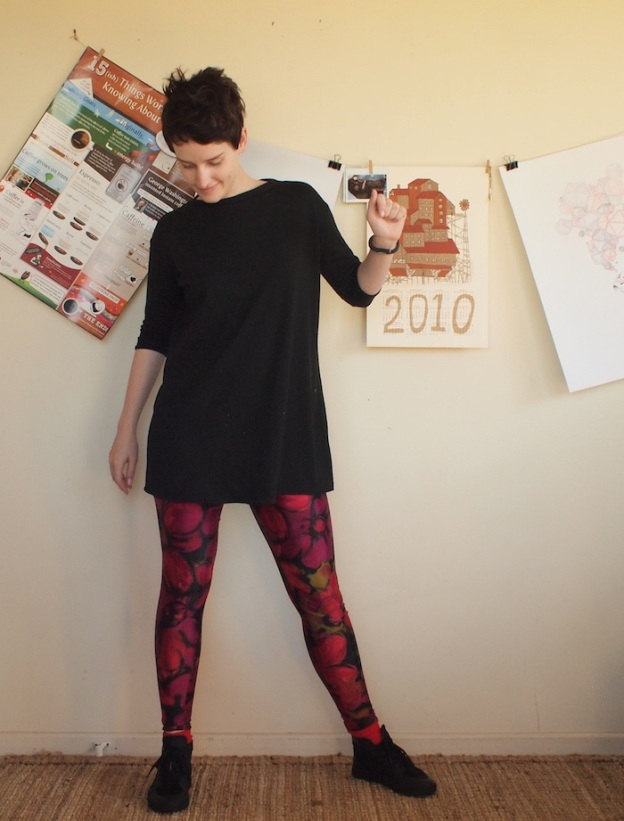
Finally, I’ve made a set of tights for actual daily clothing wear, and I super dig them. I looooooooove the floral spandex these are made out of, it’s gorgeous. I also made the top I’m wearing over them. It’s a slightly adjusted version of a boxy top I got earlier in the year, made out of a lovely black wool jersey from The Fabric Store, and it’s perfect for wearing with opaque tights (just enough bum coverage to make me feel a bit more comfortable, but not so long that it covers too much awesome-tight).

red floral tights 4 red floral tights 3 red floral tights 2 red floral tights 1

I am totally in love with these, but our winter is fast disappearing (honestly, it barely appeared), so it’ll be back to shorts and summer dresses in no time.

Anyway – I have some tights that I think are cool. I hope you do too :o)

my extra gorman boxy top

gorman is one of my favourite clothing lines in Australia, I consistently want something out of their current season, and although it’s not exactly in a price range that allows me to have a wardrobe full of the stuff, I tend to buy myself something from there a couple of times a year (usually in one of their frequent and excellent sales). These little treats are usually some of my favourite pieces of clothing.

This winter my treats from gorman were a boxy black wool top and some sneakers (pictured). For a top that is literally just black and not very exciting at all, it’s a bit weird how much I want to wear this thing all. the. time. Boxy tops might be my new favourite thing. Anyway, while I was unsuccessfully avoiding The Fabric Store winter sale, I spied some fabulous green wool knit and knew I had to have another version.

So, this top is a total copy of a gorman top I absolutely love, and now I have it in another awesome colour (this green is seriously great – I’ve never been this in love with a shade of green).


boxy green top

boxy green top

I used bands for the neckline, which I attached to the pattern pieces *before* I sewed the front and back together, because I wanted to keep the neckline style similar to the original.

I haven’t done a great deal of knit sewing, and although I have an overlocker, I’ve been put off by hems. This time I tried the twin-needle trick. I’ve been wary of this because I didn’t understand how a straight stitched hem would work when knits need a stretchy stitch. I finally read somewhere that the zig-zagging between the stitches at the back allows for stretch, and was convinced to give it a shot. I should probably just have trusted the millions of other very-experienced bloggers that have recommended this for knits frequently, because IT’S AMAZING and there’s zero rippling, but I like understanding *why* things work.

boxy green top boxy green top

Anyway, now I have two of my new favourite top, which I can use to see out our incredibly mild and short-lived winter. Hopefully I still love boxy tops this much next year.

the lace curtain dress

I finally decided to have a shot at doing something with lace – I bought a piece from reverse garbage, a place in Brisbane that sells odds and ends from all sorts of places with the hope of people finding a use for others’ junk. Anyway, I assume this fabric was a lace curtain in a past life, and I got a couple of metres for $6. Yay! Bargain!

I previously got going on Cambie dress, and despite making a muslin, had some neckline gaping issues. My attempt to fix them post-hoc made things ten times worse, and as a result it’s on the mending pile. Hopefully I’ll get the energy to do something about it, because I *love* the pattern, and it’s in a really pretty cotton.

Anyway, this dress is a bit improvised, but the bodice started out as the Cambie bodice pattern. I made the neckline straight (as per Tasia’s tutorial here), and totally removed the top of the back, so it’s just straight across:

lace dress back

oops. The back hem isn’t as wonky as this photo suggests. I just think it was unironed… (typical)

The bodice has 3 layers: the lace layer, the underlining, and then a lining. You know when you’ve read about a technique and you get really excited when you get to put that knowledge in to action? That’s how I feel about the underlining for this dress. I started with just the lace pieces:

and then pinned them to the underlining (identical pattern pieces, in cotton):

… and sewed them together, so I can treat them as one pattern piece.

I haven’t used underlining for anything before, but I’m planning to use it for a linen dress to limit wrinkling.

For the skirt, I didn’t use an underlining, so there’s just two layers. I wanted the top (lace) layer to hang free of the cotton lining underneath, so I just sewed them separately. Originally, I had the skirt gathered at the waist…

… but I wasn’t totally sold, so I tore it all to pieces and hacked a bunch of fabric off the outside edge. Now it’s like an a-line with some subtle gathers. Voila!

lace dress and q lace dress

Because I cut this before fixing my previous neckline fitting issue (I know, I know), I had to insert some extra darts that come in just to the side of the straps, but I’m really happy with how it turned out. SUPER cute… agreed?

I’m a little careful to wear it with casual/colourful accessories to downplay a possible wedding-dress look, I think I’m being successful so far.

lace dress

catchups

A year between posts is *totally* reasonable… (let’s try this again).

I’ve been doing more sewing than anything else, but there’s been zero photography and documentation. It’s probably about time for that to change – camera, timer, here I come.

I’ve just put a few projects up over at Kollabora… I signed up when it first started but haven’t really been using it. It seems like there’s a good little community getting going though, and I like that there’s some variety in the kind of things that people post.

I’m still hosting semi-regular make + do afternoons, but at a slightly less frenetic pace than last year. At the last one I had a crack at this cuff tutorial from the Purl Bee, and I’m pleased to say that (on the second try) it turned out brilliantly. Here are some instagram snapees..

cuff

cuff2

The other thing I have been (slowly) working on is my Archer shirt.  I started it at a make + do afternoon months ago and only recently finished it on a trip to fetch the dog from holidays with my mum. I don’t really think of my sewing machine as portable, but it was actually really easy to pack up everything I needed, and I got this pretty much finished while I was away. More sewing holidays might await…

OLYMPUS DIGITAL CAMERA OLYMPUS DIGITAL CAMERA

Anyway, look, this thing is my favourite. I’m sooooo proud of it, it’s a beautiful pattern and the sewalong makes it really straightforward to put together. The fabric is a silk print from The Fabric Store, with a teensy bit of stretch (the walking foot for my sewing machine helped a great deal while putting this together).  I had to narrow the shoulders a little, and I forgot to put the pockets on (I’ve decided I’m happy without them now), but otherwise, no drastic changes :o).

OLYMPUS DIGITAL CAMERA OLYMPUS DIGITAL CAMERA

I’m definitely going to make more of these. Probably in a cream silk or cotton next, which I think will be a serious workhorse in my wardrobe.

Finally, my puppy is home after a rather long ‘holiday’ with my mum, and I’m excited about it, so here’s some puppy in an adorable jacket we got him in Japan last year…

Q in jacket

Loads more projects to cover, but that’s enough for now. ciao!

tool wrap times

Last make + do, I decided that I needed a better way to store them, as really, I’ve got too many things on my bench, and there’s too much moisture in the air here to avoid them rusting when they’re left out.

Solution? A tool wrap!

I have store-bought wrap like this for pencils, which is great, but it doesn’t allow for other items of different sizes, so homemade was the way to go. I managed to take photos along the way, so I can show you how I put it together. This would work well for anything long and skinny that needs storing or transporting – pencils, pens, brushes… chopsticks?

Brad and I are planning to (eventually) make bags, so we had a whole whack of canvas sitting around that suited perfectly, it’s nice and heavy.

I started by gathering up all the things I wanted to put in my wrap, and measured up how big the pockets for each item needed to be. Messily. And with a few changes to the plans, as seen below. Gosh, my handwriting…

I cut three pieces of canvas – one base piece and two top pieces for the file pockets. I have two different file sizes, so I wanted the pockets to be two different heights, and I just sewed these together to make one top piece. The top piece has to be longer than the base piece, to allow a ‘pocket’ for each item to form.

I marked out the spacing of the pockets on both base and top pieces, and sewed lines down to make the pockets (getting them relatively straight was probably the hardest bit of the whole process).

When they were all done, I checked the sizing… Success!

To finish the edges, I cut bias strips of canvas to make a super-heavy bias tape…

… attached it on one side…

… and then the other. Starting to look like a proper thing now huh?

To wrap it up, I happened to have some scraps of leather from Reverse Garbage, so I measured out and cut lengths to sew on straps…

Voila! Tool wrap! I factored in a few extra pockets to accommodate future acquisitions.

I haven’t got anything to secure the straps with yet, but I quite like it just them just folded under, so I’ll see how I go for a while. If they get annoying I might look into a buckle or some other simple closure.

I also attached some little leather loops so that I can hang up the whole wrap and easily access files while I’m working. Here it is hanging up on my pegboard… awesome huh?

Brad is requesting one for his bike tools, so I might be at it again in the not too distant future :o) It’s a pretty satisfying project – highly recommended…

eight

Hey hey hey! It’s been a busy month over our way, but never fear, there was definitely time to fit in a bit of make + do activity…

Yesterday afternoon was incredibly enjoyable and relaxing. It was pretty quiet, but very hands-on.

There was a fair bit of bike-related activity:

oiling…


…and safety gear, for spray painting…


It was also very nice to see some lino-cuts being prepped for printing. Maybe next month we’ll bring out the inks?


I started work on a tool wrap, which I (nearly) finished this morning. I’m going to put up some shots of its insides and construction in a separate post, because I remembered to document the process, and because I’m particularly excited about how well it turned out…

And finally… CUTE DOG ALERT

Next month is looking like August 11th, for those of you around Brisvegas.

seven

Make + Do June was lovely – a relaxed afternoon with knitting, calligraphy, embroidery and beer!

Great green! (re)learning to knit is easier when there is tasty cheese to eat (fact).

Calligraphy = tricky and time consuming (or so I can gather from the painstaking practice going on here). It looks magic though.

yes, that is a different set of hands, which means TWO calligraphy apprentices. I might have to request an illuminated book, that’ll keep them busy.

…aaaand, embroidered cushion covers! I should have got a photo of the actual pattern, but instead you just get this action shot. Action shots all round for this month. I would like to give this a go. Embroidery scares me for no good reason (I think I’m self-conscious about my hand-stitching abilities?)

I continued working on my knitted scarf (no, it’s still not finished. I might miss this winter and aim for the next one?), and then got bored and started sewing a singlet top, which I did finish but haven’t taken good photos of yet. Likely story.

I’m also trying to make something out of some lace curtain fabric I bought from reverse garbage a while ago (total bargain) – here’s a sneak peek of underlining the bodice:

I changed my mind about the skirt and pulled it to pieces mid-construction, so hopefully all is not lost.

Next Make + Do is on July 21…  time marches on far too quickly. I’m thinking about doing some printing or dyeing next time around – time to get my hands dirty!

long earrings

I meant to part with these, but somehow I ended up wearing them…

20120607-162838.jpg

I’ve been on a bit of an earring kick lately… I blame the short hair.

Excuse the shoddy iPhone photos, I keep forgetting to properly document things…

20120607-162956.jpg

six

So, if you’re ever faced with an afternoon of boredom, can I HIGHLY recommend getting a whole hunk of plasticine and bashing it in to some manner of beast… or not beast… it’s just very satisfying.

We gradually got around to make + doing last (ek!) weekend. To be honest, the actual ‘animating’ took more than an afternoon. I’ll let the piccis tell the rest…

Such concentration!

Have you ever seen anything more ADORABLE???

We got a *bit* of animating done… check out our (slightly fuzzy and dodgily lit) movie!

anyway… I challenge you to find a better way to kill time… Except maybe MarioKart.

get outta my flowers, snail!